Tuesday, September 27

BIT LOCKER DRIVE ENCRYPTION IN WINDOWS 7 - TPM BYPASSING


  • THIS DRIVE ENCRYPTION TECHNIQUE IS ONLY FOR ULTIMATE & ENTERPRISE EDITION FOR WINDOWS 7. BUT STILL YOUR SYSTEM REQUIRES TRUSTED PLATFORM MODULE (TPM) FOR ENCRYPTION.
  • A TPM IS A MICROCHIP DESIGNED TO PROVIDE BASIC SECURITY-RELATED FUNCTIONS, PRIMARILY INVOLVING ENCRYPTION KEYS. THE TPM IS USUALLY INSTALLED ON THE MOTHERBOARD OF A COMPUTER OR LAPTOP, AND COMMUNICATES WITH THE REST OF THE SYSTEM USING A HARDWARE BUS.
*************************************************************************************************************************************
  • To encrypt an entire drive, simply right-click on the drive and select Turn on BitLocker from the context menu.
  • A TPM ERROR, if you have a drive that doesn’t have a compatible TMP then you’ll need to use the following steps and have a flash drive.
  • Enter in gpedit.msc in the search box of the Start menu and hit Enter.
  • Under Local Computer Policy navigate to -->


    Computer Configuration \ Administrative Templates \ Windows Components \ Bit Locker Drive Encryption \ Operating System Drives

    and double click on Require additional authentication at startup.
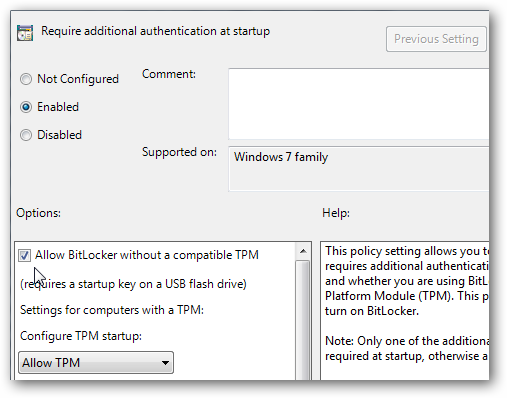
  • Enable the feature and check the box next to Allow BitLocker without a compatible TPM, click Apply and Ok, and close out of Local Group Policy Editor.
  • Go back to the hard drive you want to encrypt and turn on BitLocker. A restart will be required to prepare the disk, and at this point make sure the flash drive is plugged in.
  • After the restart you’re prompted to use the startup key on the flash drive every time you start the computer.
  • Select the drive you want to use to store the key.
  • Again, simply right-click on the drive and select Turn on BitLocker from the context menu.
  • Next you’ll need to choose a secure password that will be used to access the drive.
  • You’re prompted to store the recovery key which is used in the event you lose your password or smartcard. If you store it as a file make sure that it’s not on the same drive that you’re encrypting.
  • Confirm you want the drive to be encrypted then wait until the process is complete. The amount of time it takes will vary based on the size and amount of data on the drive.
  • To access the encrypted drive you’ll need to enter in the password to unlock it.
  • The drive icon will change to show it’s encrypted with BitLocker, where the gold lock indicates it’s locked up and the gray lock is displayed after you have unlocked it.


Sunday, September 25

CREATE YOUR OWN WINDOWS SHORTCUT - SHUTDOWN, RESTART, HIBERNATE, LOCK, SLEEP.


  • SIMPLY CREATE YOUR OWN SHORTCUTS, WHILE IN CASE OF EMERGENCY, YOU DON'T HAVE TO GO FOR START MENU. JUST CLICK ON YOUR SHORTCUT & YOU ARE DONE.
****************************************************************************************************************************************

SHORTCUT FOR WINDOWS SHUTDOWN

  • On Desktop, Right Click, NEW --> SHORTCUT.
  • Next, In the Location Item Type --> "shutdown -s -t 00". Click Next.
  • Write Your Name for shortcut. Click Finish & You are Done.
TO MAKE OTHER SHORTCUT's JUST TYPE IN LOCATION TYPE -->
  • FOR RESTART --> "shutdown -r -t 00"
  • FOR HIBERNATE MODE

"rundll32.exe PowrProf.dll,SetSuspendState"

  • LOCK WORKSTATION 

"rundll32.exe User32.dll,LockWorkStation"

  • SLEEP COMPUTER 

"rundll32.exe powrprof.dll,SetSuspendState 0,1,0"


---------------------------------------------------------------------------------------------------------------------------------------------------------------------------------------------------------------------------------------


YOU CAN ALSO CHANGE THE ICON OF YOUR SHORTCUT. JUST RIGHT CLICK ON SHORTCUT, GOTO PROPERTIES --> SHORTCUT --> CHANGE ICON. CLICK APPLY & OK.


  • AFTER CHANGING ICON, YOUR SHORTCUT WILL SOME WHAT LOOK LIKE THIS. 
--------------------------------------------------------------------------------------------------------------------------------------------------------------------------------------------------------------------------------------------------------------------------------


CHANGE YOUR MONITOR TIMEOUT TIME


  • IT HAPPENS SOME TIMES THAT, AFTER A WHILE YOUR MONITOR GOES TO SLEEP OR  IT TURNS OFF. IT'S A BIT FRUSTATING WHILE YOU ARE STILL ON WORK OR READING OR WATCHING SOMETHING.
  • POWERCFG COMMAND LINE UTILITY IS USED TO TOGGLE POWER SETTINGS.
**************************************************************************
  • Open COMMAND PROMPT & Type -->
powercfg -change -monitor-timeout-ac 30
  • This Command will change your monitor power setting to turn-off after 30 minutes. You can change according to your needs. REMEMBER "AC" USED IN THIS COMMAND IS WHEN YOUR LAPTOP IS ON POWER-ON i.e. CHARGING.
  • You can also change this Monitor power setting when ON BATTERY, by executing this command --> 
powercfg -change -monitor-timeout-dc 30

**************************************************************************


Saturday, September 24

DISABLE AERO SHAKE IN WINDOWS 7


ONE OF THE INTERESTING NEW FEATURES IN WINDOWS 7 IS THE WAY YOU CAN GRAB A WINDOW BY THE TITLE BAR AND “SHAKE” IT BACK AND FORTH TO MINIMIZE EVERYTHING ELSE.
**************************************************************************
  • Goto "RUN" & Type "regedit.exe".
  • Navigate to -->
HKEY_CURRENT_USER\Software\Policies\Microsoft\Windows
  • Once you are there, right-click on the Windows key and create a new key called "Explorer".
  • Now right-click on the right-hand side, create a new 32-bit DWORD with the following settings -->


  • Name: NoWindowMinimizingShortcuts

  • Value: 1

  • Once you’ve created this, you should log off and back on for the change to take effect.
-----------------------------------------------------------------------------------------------------


TEST DRIVE WINDOWS 7 ONLINE WITH VIRTUAL LABS


  • Microsoft has setup a special Windows 7 Test Drive website with resources to help IT professionals test and deploy Windows 7 in their workplaces.  This is a great resource to try out Windows 7 from the comfort of your browser, and look at some of the new features without even installing it.
  • Please note that the online version is not nearly as responsive as a full standard install of Windows 7.  It also does not run the full Aero interface or desktop effects, and may refresh slowly depending on your Internet connection.  So don’t judge Windows 7’s performance based on this virtual lab, but use it as a way to learn more about Windows 7 without installing it.
**************************************************************************

  • On Visiting Microsoft's Website, Look At Bottom Of Page. You can Take Test Drive's According to your requirements. Any Security Feature you want to test or simple PC management. I choosed Security control test drive [middle one].
  • Next Window you can see several Security Features they give you for trial, like BITLOCKER, IE8, UAC etc. I choosed to take a trial of BITLOCKER. Click on Test Drive.
  • Next Window You will see that particular "Launch Virtual Lab" as above. Click on it and move forward.
  • Next screen it will check for requirements. Anything missing is indicated in Red Text. Since, you can see above i was running this in google chrome. I need to use IE updated version to get things started.
  • Next Screen you can, it will ask for Allowing the "Remote Desktop Services ActiveX Client". Click on Allow & move forward.
  • Next Screen will be a Processing Virtual Lab screen. It make Take time according to your Internet Connection Speed.
  • Next Screen, you can see on Right, You can navigate according to what you like. Whether you want to see Video Demo on Virtual Machine or you can download PDF version also.
 SOME MORE SCREEN-SHOTS


THESE VIRTUAL LABS ARE GREAT FOR TECH STUDENTS, OR THOSE OF YOU WHO WANT TO GET A FIRST-HAND TRIAL OF THE NEW FEATURES.

----------------------------------------------------------------------------------------------------------------------------------------------------


DISABLE START-UP PROGRAMS IN WINDOWS 7


  • FRUSTATED OF SOME CREEPY PROGRAMS, THAT START EVERY TIME YOUR WINDOWS START. DISABLE THOSE START-UP PROGRAMS & TAKE OUT SOME LOAD FROM YOUR PERSONAL WINDOWS.
  • 2 WAYS TO COMPLETELY DISABLE THE START-UP PROGRAMS OF YOUR WINDOWS.

********************************
USING MSCONFIG
********************************
  • Type in RUN, "msconfig". A Window will Open Up.
  • There Goto "startup" Tab. There You can see all those programs that start every time on your windows start-up.
  • Simply Disable or Enable all those programs. Or you can simply Untick those specific programs from those you want to get rid-off.


***********************************
USING CCLEANER
***********************************
  • Install & Open CCLEANER. Goto, TOOLS --> START-UP.
  • There you can all those start-up programs. Simply Click on any program you want to Disable, Enable or even you can Delete it also.


Friday, September 23

INVISIBLE FOLDER


  • IN THIS TRICK YOU WILL LEARN, HOW TO CREATE AN INVISIBLE FOLDER IN WINDOWS 7. THIS MAY HELP YOU IN BETTER SECURING YOUR PERSONAL DATA AS FOLDER SEEMS INVISIBLE. IT IS VISIBLE ONLY ON REFRESHING THE WINDOW CONTINOUSLY  GIVING A BLURRY LOOK.
  • CONCEPT IS THAT WE WILL NAME THE FOLDER "0160" [WHILE HOLDING ALT KEY] WHICH IS SPECIAL CHARACTER HANDLES BY WINDOWS. SO SWEAT YOURSELF HOW TO CREATE 2 INVISIBLE FOLDERS AT SAME LOCATION??????
  • Open "NUM KEY". Press "ALT KEY", HOLD IT, & While Holding ALT KEY, Press "0160".

  • REMEMBER that "0160" should Only from the Right Num Key Pad Numeric Key. Or If You Do not have that Extra Numbers provided, Just Check if there are any Numbers on alphabet keys mentioned. LIKE IOPJKLBNM are possible Alphabet Keys.
  • Now You can see the file name is nothing, Since it is Special Character. Right Click, Properties --> Customize --> Change Icon. Navigate a Quater as you can see above picture, An Icon With Nothing to Display.
  • Press, Apply that Icon & Ok. On Clicking only You can see that folder, as you can see in above picture. 
  • REMEMBER DURING THIS WHOLE PROCESS, HOLD ALT KEY WHILE PRESSING 0160 WITH NUM KEY OPEN.