Sunday, October 16

FILE ENCRYPTION BEHIND IMAGE FILE


  • ENCRYPT YOUR FILES BEHIND IMAGE FILES, USING CMD IN WINDOWS 7.
  • YOU CAN HIDE ANY KIND OF FILE, FROM DOCUMENT FILE TO AUDIO & VIDEO FILES. BELOW I AM USING, DOCUMENT FILE TO ENCRYPT BEHIND IMAGE.
  • NOTE TO MAKE FOLDER INSIDE C DRIVE ONLY, ELSE IT WON'T WORK.
----------------------------------------------------------------------------------------------------------------------------------------

  • Make folder inside C Drive, i make it "myc". Now Place the files inside folder & ".jpeg" Image Files. I place 2 Document Files named as "pogo.docx" & "pug.docx" & an Image File named as "ni.jpeg".

  • Now Winzip or Winrar both .docx file & name it anything you want. I Name it, "mix.rar".
  • Now Open "CMD", Goto C Drive & Navigate to folder containing files.
  • Now Type -->
copy /b ni.jpeg + mix.rar rion.jpeg

  • Enter, next you will see confirmation message. A new Image File is created as "rion.jpeg". This file is your encrypted Image file, that looks same like other Image File.
  • TO SEE THE ENCRYPTED FILE BEHIND IMAGE FILE, JUST RENAME IT TO ".rar" FILE &  UNZIP IT. OR YOU CAN OPEN THAT IMAGE FILE USING RAR & SEE THOSE FILES.
----------------------------------------------------------------------------------------------------------------------------------------


Tuesday, October 4

WINDOWS 8 SECURITY FEATURES


Windows 8 includes a number of new and improved security features, here are some of them.


--------------------------------------------------------------------------
  • PICTURE PASSWORD

  • Microsoft previewed a new touch-based security login at BUILD called picture password. 
  • Here's how it works: The user selects a picture, then makes three touch gestures on top of the image. The system remembers that sequence, and then the user repeats that sequence of gestures to login. 

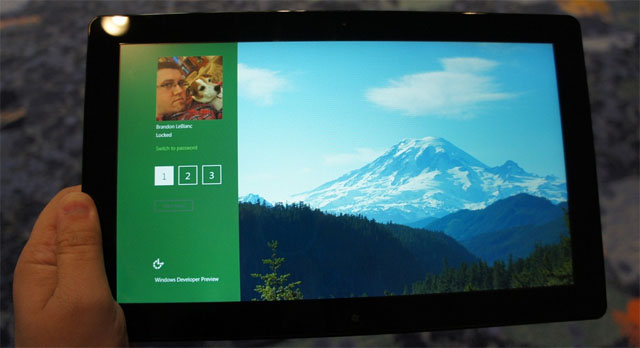
  • For example, a user could have a picture of a pet as their startup screen, then use touch to draw a smile and touch both eyes of the dog.
  • The gesture is tied to the image, and increases login security considerably. (Microsoft applied for a patent for the "sketch-based password authentication" technology behind picture password several years ago.)
  • Microsoft explains that the system does not authenticate users based on an exact match of their drawing. “It authenticates based on the future similarity between an edge orientation pattern extracted from the sketch the user enters and an edge orientation pattern extract from the user’s pre-registered template sketch,” explains the patent filing. 
  • The feature, demonstrated below, is particularly useful for touch-based devices but also works well on a standard keyboard and mouse setup in Windows 8.
--------------------------------------------------------------------------

  • UEFI SECURE BOOT SUPPORT


  • Windows 8 supports the secure boot feature offered in the Unified Extensible Firmware Interface (UEFI), which should provide an additional layer of protection during the system startup process.

  • Windows Secure Boot is a new feature that protects users against malware that affects the boot path. Common malware affecting boot path include boot loader viruses, boot sector viruses and rootkits that try to load as malware. 

  • Windows Secure Boot relies on allowing only signed and validated code to load during the boot process  in order to the secure the boot path. If the code is unsigned, then the Windows Recovery Environment will be started which will try to fix the problem.

  • This service will require UEFI based Secure Boot feature to function. A point to note is that, even though the code is validated during the boot process, Microsoft has managed to reduce the boot time in Windows 8 significantly.


-------------------------------------------------------------------------

  • OS SMART SCREEN FILTER
  • Social Engineering is one of the most dangerous weapons that the hackers have. Even the most tech savvy person can fall prey to these kinds of attacks if proper caution is not taken. 
  • IE9 already has a Smart Screen filter which will warn you when you try to visit a page with suspicious behaviour. With Windows 8, Microsoft is implementing this system wide. For this purpose, an application reputation database will be used. 
  • When you download a file, a reputation check is triggered and if the application that you downloaded is not rated, a message will be displayed warning the user.
  • See the Actual Difference between what smart screen actually do in Windows 8 & what it means in Windows 7.
-------------------------------------------------------------------------
  • OFFICIAL WINDOWS 8 READER
  • One of the most noteworthy potential new features of Windows 8 from a security perspective could be the new Windows 8 integrated document reader, which will reportedly support PDF (and potentially more) file formats. 
  • PDF files and flash plug-ins have been notoriously porous from security point of view, and Modern Reader may signal a move by Microsoft to add yet even more default security to the Windows platform, a move that would echo recent statements about a move toward enhanced platform security made by other Microsoft executives.
  • An integrated Microsoft reader would undoubtedly be part of the unified Windows Update OS patching process, which removes the need for users (and admins) to worry about patching products from another vendor using a separate (and non-synchronized) update process, as is the case with Adobe's stand-alone product patching system. 
  • That move does fit with Microsoft's recent move to a more aggressive security posture when it comes to making Windows (and other core Microsoft applications) as secure as possible, possibly at the cost of angering Microsoft partners like Adobe.

--------------------------------------------------------------------------

  • EXPLOIT MITIGATION ENHANCEMENTS
  • A number of improvements at the code level that give Windows 8 enhanced protection against software exploits, including improved Address Space Layout Randomization (ASLR), which works by "randomly shuffling the location of most code and data in memory to block assumptions that the code and data are at same address on all PCs." 
  • Windows kernel and Windows heap have been revamped with  code improvements and integrity checks, respectively, that should harden Windows 8 and make it even more difficult for software exploits to work properly.  
--------------------------------------------------------------------------


Wednesday, September 28

DECRYPT ENCRYPTED FILES - WINDOWS 7


FOLLOWING THE ENCRYPTION OF FILES IN WINDOWS 7, YOU NEED TO DECRYPT THE ENCRYPTED FILES. LINK FOR WINDOWS 7 FILE ENCRYPTION.


You may need to decrypt your files in the following circumstances :

  • Moving files to a new computer.
  • Re-formatting your current machine and using your encrypted files on the new installation of Windows

Exporting Your Current Encryption Key

  • When you learned how to encrypt your files, you created an encryption key. To export your key for use on another computer or on a new installation of Windows, do the following.
  • Press Winkey+R to open the run dialogue (Start > Run), and type mmc.
  • Click File > Add/Remove Snap in…
  • Select Certificates and click Add.
  • Click My user account and click Finish. Click Close. Click OK.
  • At the console root, expand CertificatesCurrent User > Personal > Certificates. Now right click on your user name and click All Tasks > Export…
  • Unless you want to change them, keep the defaults and give your exported file a name.
-------------------------------------------------------------------------------------------------------------------------------------------------------------------------------------------------------------------------------------------------------------------------------------------------------------------------------------------------------------------------------------------------------------------------

Importing Your Backed Up Certificate

  • Press the Winkey+R to open the run dialogue, and type mmc.
  • At the console root, expand CertificatesCurrent User > Personal > Certificates. On a blank area in the right-hand pane right click and click All Tasks > Import…

  • Locate your backed up file and click Next.
  • Type in the key’s password (set when you created it), and check Mark key as exportable if you would like the option to transfer it, again, in the future. Check Include all extended properties and click Next.
  • Choose to store the certificate in your personal store and click Next.

  • You will be notified of the success of the import. You can now access your encrypted files again.

-----------------------------------------------------------------------------------------------------------------------------------------------------------------------------------------------------------


FILE ENCRYPTION ON HARD DRIVE - WINDOWS 7


  • THIS SECURTY FEATURE IS ONLY ENABLED FOR WINDOWS 7 ULTIMATE & ENTERPRISE EDITON. 
  • IN THIS SECURITY LESSON, YOU WILL CAME TO KNOW ABOUT THE IN-BUILT ENCRYPTION TECHNIQUE IN WINDOWS 7. HOW YOU CAN ENCRYPT YOUR FOLDER OR WHOLE HARD DRIVE USING WINDOWS 7 OFFICIAL ENCRYPTION TOOL.
**************************************************************************************************************************************

ENCRYPT YOUR FILES


  •  Right-click the file folder you wish to encrypt and click Properties.
  • In the Properties dialog, click Advanced.
  • Check Encrypt contents to secure data and click OK.
  •  If you are encrypting a folder, you will be asked if you want to apply the encryption to sub-folders. This is useful if you want to protect the whole tree under the folder you are encrypting.
  • Your files will now be encrypted.
  • Notice the file or folder names are now green–this provides an easy way to show the data is encrypted.
--------------------------------------------------------------------------------------------------------------------------------------------------------------------------------------------------------------------------------------------------------------------------------

DECRYPT YOUR FILES

If you want to decrypt your files or folders so they can be accessed on a different computer, simply follow the steps above and uncheck Encrypt contents to secure data.

Back Up Your Private Encryption Key

  • If you move your files to a new computer, operating system, or user account, you will need the private key to access your files. To backup the key after encrypting your files, do the following:

  • After encrypting your files for the first time, and icon should appear in the system tray. Double click on it.
  • Click Back up now (recommended).
  • On the Certificate Export Wizard, click Next.
  • Choose Personal Information Exchange and click Next.
  • Type a password and click Next.
  • Save your encryption key & CLICK FINISH.
  • You will be notified that the certificate export is successful.
  • Back up the certificate for later use.  Your files and certificate are now protected.


----------------------------------------------------------------------------------------------------------------------------------------


Tuesday, September 27

PRIVATE BROWSING MODE EXPOSED


  • PRIVATE BROWSING AIMS TO HELP YOU MAKE SURE THAT YOUR WEB BROWSING ACTIVITIES DON'T LEAVE ANY TRACE ON YOUR OWN COMPUTER.  IT IS VERY IMPORTANT TO NOTE THAT PRIVATE BROWSING IS NOT A TOOL TO KEEP YOU ANONYMOUS FROM WEBSITES OR YOUR ISP, OR FOR EXAMPLE PROTECT YOU FROM ALL KINDS OF SPYWARE APPLICATIONS WHICH USE SOPHISTICATED TECHNIQUES TO INTERCEPT YOUR ONLINE TRAFFIC.  PRIVATE BROWSING IS ONLY ABOUT MAKING SURE THAT FIREFOX DOESN'T STORE ANY DATA WHICH CAN BE USED TO TRACE YOUR ONLINE ACTIVITIES, NO MORE, NO LESS.
  • HERE BELOW YOU WILL SEE, HOW YOUR DATA WAS STILL SAVED IN YOUR COMPUTER & ANY ONE CAN STILL TRACE YOU. PRIVATE BROWSING STILL NOT SAFE 100%.
**************************************************************************


USING THE COMMAND LINE


  • When you enter on a website, you first tell the browser the name of the site you want to visit. To contact that website, the computer needs to find the IP associated with the website name; to do this, it uses a DNS server.
  • As you can read the process is very straightforward. As it’s not necessary to get this IP address every time, Windows uses a program (a DNS client) to store this information.
  • To test everything first we are going to clear entries in the DNS client.
  • Press WinKey + R, type cmd and press Enter to open a command line.

  • In the command line type "ipconfig /flushdns" and press Enter.

  • You can see the DNS resolver cache using "ipconfig /displaydns".

  • Now we are going to open a Chrome window and go to any website using Incognito mode. This is the private mode of Google Chrome. To open a window in this mode press "Ctrl + Shift + N".

  • Can you imagine what happens if we close this window and check the DNS cache using "ipconfig /displaydns".
  • As we can see Chrome doesn’t remove this information from the DNS cache.
--------------------------------------------------------------------------------------------------------------------------------------------------------------------------------------------------------------------------------------------------------------------------

USING SCRIPT


  • You have to copy this to a notepad file :

@echo off

Powershell -noexit "ipconfig /displaydns | select-string 'Record Name' | foreach-object { $_.ToString().Split(' ')[-1]   } | Sort | Out-Gridview"


  • As always go to File menu, click Save As…, and give the file a name i.e. ShowDNSCache.bat. (Include the quotes to save the file as a BAT file and not a TXT file.)

  • We can now easily find that someone has browsed Windows Guides (or any site.)
----------------------------------------------------------------------------------------------------------------------------------------


BIT LOCKER ENCRYPTION PORTABLE MEDIA IN WINDOWS 7


  • THIS DRIVE ENCRYPTION TECHNIQUE IS ONLY FOR ULTIMATE & ENTERPRISE EDITION FOR WINDOWS 7. BUT STILL YOUR SYSTEM REQUIRES TRUSTED PLATFORM MODULE (TPM) FOR ENCRYPTION.
  • IN THIS ENCRYPTION TECHNIQUE, YOU WILL LEARN HOW TO ENCRYPT YOUR PORTABLE MEDIA LIKE PEN DRIVE USING BIT LOCKER.
*****************************************************************************************************************

    • Plug your thumb drive into a USB port.
    • Click the Start button, type BitLocker, and click on BitLocker Drive Encryption.

    • Next to your thumb drive, click Turn on BitLocker.

    • If your thumb drive is compatible, BitLocker will prepare it.

    • Choose a password and click continue.

    • Either save your recovery key (used if you forget your password) or print a copy of it out.

    • If you save the file, ensure it’s stored somewhere safe.

    • Confirm your chosen settings and password and click Start Encrypting.

    • Your drive will now be encrypted, If you have a large thumb drive, this may take a long time.
    ------------------------------------------------------------------------------------------------------------------

    Verifying Your Thumb Drive is Encrypted Properly


    • When protecting your data or anything you own, it is important to ensure the protection actually works. I took my thumb drive out of the Windows Seven machine and put it in a Vista machine. You should do the following too, to ensure your data is protected.
    To verify your data is protected, do the following:
    Put your thumb drive in another PC and try to open the files. You should see a BitLocker setup file, which shows BitLocker is not installed on the computer you’re testing on. If you have BitLocker installed on the machine, you will be prompted for a password (see the next step).

    • If you have BitLocker installed on the PC you are testing on, you will be prompted for your password.
    • Enter your password to get to your data.
    --------------------------------------------------------------------------------------------------------------------

    Removing Bit Locker Encryption

    • Plug your thumb drive into a USB port

    • Click the Start button, type BitLocker, and click on BitLocker Drive Encryption.
    • Next to your thumb drive, click Turn Off BitLocker, and click Decrypt.
    • Your drive is no longer encrypted.